
1.1 产品概述
GBase 8c是南大通用自主研发的一款多模多态的第三代智能分布式数据库,通过智能优化,智能运维,智能安全实现DB智能化,使GBase8c具备高性能、高可用、弹性伸缩、高安全性等智能特性。
支持行存、列存、内存等多种存储模式,单机、主备式、分布式等多种部署形态和ORACLE、PG、MYSQL多种兼容模式,可以部署在物理机、虚拟机、容器、私有云和公有云,为关键行业核心系统、互联网业务系统和政企业务系统提供安全、稳定、可靠的数据存储和管理服务,满足各种应用场景。
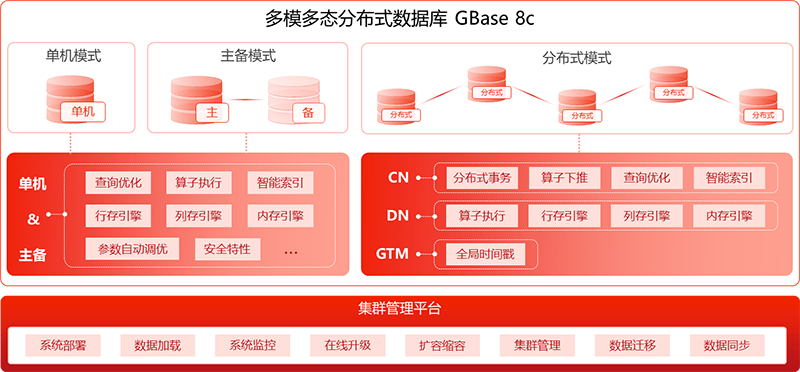

1.2 产品架构
GBase 8c支持主备式与分布式两种部署,支持行存、列存、内存三种存储引擎,满足用户各种业务需求。
多存储模式
- GBase 8c支持多个存储引擎以满足不同场景的业务需求:
- 行存储引擎:主要面向OLTP场景设计,例如订货、发货、银行交易系统;
- 列存储引擎:主要面向OLAP场景设计,例如数据统计报表分析系统;
- 内存引擎:主要面向极致性能场景设计,例如银行风控场景。
多部署形态
GBase 8c通过多租户方式实现多种部署形态,可提供单机部署、主备部署及分布式部署三种部署形态,并通过统一运维管理平台来进行管理,分别面向企业核心交易和未来海量事务型场景,打造差异化竞争力。
单机形态
GBase 8c支持单机部署,可以直接在一台服务器上部署数据库,这种部署的优势是最低成本,且部署简洁。
主备形态

GBase 8c支持一主多备的部署方式,主备之间可以采用同步或异步备份方式。这种部署方式部署简洁、交付高效,适用于较低数据量、追求极致单机性能,且要求数据备份的场景。
分布式形态
分布式模式,支持分布式全组件冗余的高可用,支持计算存储分离的部署。可以根据业务需求对计算和存储能力分别进行水平扩展,适用于大数据量高并发且追求数据高安全性的场景。
2.1 获取软件包
# GBase 8c 安装包获取链接中提供了分布式和主备式安装包,演示内容式分布式,需要注意cpu架构(lscpu),下载X86或者ARM版本安装包安装包下载连接:https://www.gbase.cn/download/gbase-8c?category=INSTALL_PACKAGE# 搭建操作系统环境准备操作系统和版本:CentOS 7.9建议:可以在电脑上安装虚拟机工具 Virtualbox,然后安装CentOS 的虚拟机环境,用来安装8c数据库。配置:内存最低4G,推荐8G;SWAP配置8G以上,硬盘50G以上,固定IP地址。Virtualbox安装包下载连接:https://pan.baidu.com/s/1qkd8XqF8HO7GRj7p09CuFg?pwd=ndty# linux虚拟机镜像包下载和安装该镜像操作系统安装了必要的组件、关闭了防火墙和 selinux,安装了 ntp 组件,节省了安装操作系统和配置的时间。使用 "搭建操作系统环境准备" 的Virtualbox软件导入镜像文件:操作系统镜像包文件的下载地址:https://pan.baidu.com/share/init?surl=DFziPse-5PcuQvJ2aNA5sw&pwd=ndty#list/path=%2F包含以下三个ova文件:8ch1.ova,8ch2.ova,8ch3.ova将 ova 文件下载到本机,打开 Virtualbox 软件,导入ova文件,启动虚拟系统。用户名:root 密码:111111虚拟机网络配置为“仅主机模式”
2.2 安装前准备环境
# 检查机器名
hostnamecat /etc/hostname执行结果若不一致用 hostnamectl set-hostname xxxx 修改机器名。
dd if=/dev/zero of=swapfile bs=1024 count=8000000mv swapfile root/mkswap swapfileswapon swapfile
# 安装依赖 ---- 所有节点,root用户执行
rpm -qa bison flex patch bzip2 lsb_release libaio-develyum reinstall -y bison flex patch bzip2 lsb_release libaio-develcat /proc/cpuinfo |grep rdtsc
# 关闭防火墙和selinux ---- 所有节点,root用户执行
systemctl stop firewalld.servicesystemctl disable firewalld.servicesed -i.bak '/^SELINUX=/s#SELINUX=.*#SELINUX=disabled#' /etc/selinux/configsetenforce 0sestatus
# 创建gbase用户 ---- 所有节点,root用户执行
userdel -r gbaserm -rf var/spool/mail/gbaserm -rf home/gbasegroupadd gbaseuseradd -m -d home/gbase gbase -g gbasepasswd gbase
# 配置ntpd ---- root用户执行
10.168.10.70 ---- ntpd服务主节点,一般是GTM主节点cp /etc/ntp.conf etc/ntp.conf.baksed -i '12arestrict 10.168.10.70 nomodify notrap nopeer noquery' etc/ntp.confsed -i '22,25s/^/# ' etc/ntp.confsed -i '25aserver 127.127.1.0' etc/ntp.confsed -i '26aFudge 127.127.1.0 stratum 10' etc/ntp.confservice ntpd startchkconfig ntpd on10.168.10.71 ---- ntpd服务从节点cp /etc/ntp.conf etc/ntp.conf.baksed -i '12arestrict 10.168.10.71 nomodify notrap nopeer noquery' etc/ntp.confsed -i '22,25s/^/# ' etc/ntp.confsed -i '25aserver 10.168.10.70' etc/ntp.confsed -i '26aFudge 10.168.10.70 stratum 10' etc/ntp.confservice ntpd startchkconfig ntpd on10.168.10.72 ---- ntpd服务从节点cp /etc/ntp.conf etc/ntp.conf.baksed -i '12arestrict 10.168.10.72 nomodify notrap nopeer noquery' etc/ntp.confsed -i '22,25s/^/# ' etc/ntp.confsed -i '25aserver 10.168.10.70' etc/ntp.confsed -i '26aFudge 10.168.10.70 stratum 10' etc/ntp.confservice ntpd startchkconfig ntpd on
# 配置sudo ---- 所有节点,root用户执行
sed -i.bak '100agbase ALL=(ALL) NOPASSWD:ALL' etc/sudoers# 配置免密 ---- 所有节点,切换到gbase用户执行
su - gbaserm -rf home/gbase/.sshmkdir ~/.sshchmod 700 ~/.sshssh-keygen -t rsassh-copy-id gbase@10.168.10.70ssh-copy-id gbase@10.168.10.71ssh-copy-id gbase@10.168.10.72echo 'StrictHostKeyChecking no' >> ~/.ssh/configecho 'UserKnownHostsFile ~/.ssh/known_hosts' >> ~/.ssh/configchmod 644 ~/.ssh/config免密测试ssh 10.168.10.70 datessh 10.168.10.71 datessh 10.168.10.72 date
2.3 安装数据库
# 上传软件包到其中一台服务器(示例 10.168.10.70)
mv GBase8cV5_S3.0.0B114_centos7.8_x86_64.tar.gz home/gbase/# 解压配置 ---- 10.168.10.70机器,切换到gbase用户执行
su - gbasemkdir /home/gbase/gbase_packagemv GBase8cV5_S3.0.0B114_centos7.8_x86_64.tar.gz gbase_package/cd gbase_package/tar xf GBase8cV5_S3.0.0B114_centos7.8_x86_64.tar.gztar xf GBase8cV5_S3.0.0B114_CentOS_x86_64_om.tar.gzcp gbase.yml home/gbase/
# 架构规划
+-------------+----------------+--------+| name | host | port |+-------------+----------------+--------+| gha_server1 | 10.168.10.70 | 20001 |+-----+-----------------+------+---------| gtm1 | 10.168.10.70 | 6666 || gtm2 | 10.168.10.71 | 6666 |+-------------+----------------+--------+| cn1 | 10.168.10.71 | 5432 || cn2 | 10.168.10.72 | 5432 |+-------------+----------------+--------+| dn1 | dn1_1 | 10.168.10.70 | 15432 || dn1 | dn1_2 | 10.168.10.71 | 15432 || dn2 | dn2_1 | 10.168.10.72 | 20010 || dn2 | dn2_2 | 10.168.10.71 | 20010 |+-------------+----------------+--------+
# 编辑集群部署文件gbase.yml
vi /home/gbase/gbase.ymlgha_server:- gha_server1:host: 10.168.10.70port: 20001dcs:- host: 10.168.10.70port: 2379- host: 10.168.10.71port: 2379- host: 10.168.10.72port: 2379gtm:- gtm1:host: 10.168.10.70agent_host: 10.168.10.70role: primaryport: 6666agent_port: 8001work_dir: home/gbase/data/gtm/gtm1- gtm2:host: 10.168.10.71agent_host: 10.168.10.71role: primaryport: 6666agent_port: 8002work_dir: /home/gbase/data/gtm/gtm2coordinator:- cn1:host: 10.168.10.71agent_host: 10.168.10.71role: primaryport: 5432agent_port: 8003work_dir: /home/gbase/data/coord/cn1- cn2:host: 10.168.10.72agent_host: 10.168.10.72role: primaryport: 5432agent_port: 8004work_dir: /home/gbase/data/coord/cn2datanode:- dn1:- dn1_1:host: 10.168.10.70agent_host: 10.168.10.70role: primaryport: 15432agent_port: 8005work_dir: /home/gbase/data/dn1/dn1_1- dn1_2:host: 100.0.1.71agent_host: 10.0.1.71role: standbyport: 15432agent_port: 8006work_dir: /home/gbase/data/dn1/dn1_2- dn2:- dn2_1:host: 10.168.10.72agent_host: 10.168.10.72role: primaryport: 20010agent_port: 8007work_dir: /home/gbase/data/dn2/dn2_1- dn2_2:host: 100.0.1.71agent_host: 10.0.1.71role: standbyport: 20010agent_port: 8008work_dir: /home/gbase/data/dn1/dn2_2env:# cluster_type allowed values: multiple-nodes, single-inst, default is multiple-nodescluster_type: multiple-nodespkg_path: /home/gbase/gbase_package # 安装包所在目录prefix: /home/gbase/gbase_db # 运行目录version: V5_S3.0.0B114user: gbaseport: 22gbase.yml中host和agent_host区别:host 数据面(CN/DN)访问连接的ip地址agent_host 控制面访问连接的ip地址当主机是双网卡时,建议控制面设置在千兆网卡,数据面设置在万兆网卡,以避免大流量数据影响高可用报文的实时性。
# 集群安装 ---- 10.168.10.70机器,切换到gbase用户执行
#默认gha_ctl不加-p在/home/gbase/下找gbase.ymlcd /home/gbase/gbase_package/script/./gha_ctl install -c gbase
# 查看集群状态 ---- 任一节点,切换到gbase用户都可执行
gha_ctl monitor all -l http://10.168.10.70:2379 -HI# 集群启停 ---- 任一节点,切换到gbase用户都可执行
gha_ctl stop all -l http://10.168.10.70:2379gha_ctl start all -l http://10.168.10.70:2379
3. 安装过程中常见问题整理
- 问题1:80000201:Run cmd failed:%s
定位:1.检查配置sudo 参考配置sudo
2.检查配置免密 参考配置免密
- 问题2:80000301:Rransport endpoint unreach
取消resolv配置,恢复主备间时延。
在/etc/resolv.conf配置文件中注释# nameseever xx.xx.xx.xx# nameserver xx.xx.xx.xxsudo systemctl stop etcd
- 问题3:安装过程中提示:无法exec:没有那个文件或者目录
缺失依赖文件yum install -y bzip2
- 问题4:80000208: Url requests failed:exception happen
查看日志报错 Connection refused 10.168.10.70:2379
问题原因:所有安装etcd的节点的libssl.so.1.0.2k权限必须为755
处理方式:
1.查看libssl.so.1.0.2k权限是否为755ls -l /usr/lib64/libssl*ls -l /usr/lib64/libcrypto*sudo chmod +x /usr/lib64/libssl.so.1.0.2ksudo chmod +x /usr/lib64/libcrypto.so.1.0.2k2.重启etcd节点sudo systemctl restart etcdsudo systemctl status etcd
4.连接和SQL测试
4.1 连接
# 本地连接
gsql -d postgres -r -p 5432create user test with sysadmin createdb password 'test@1234';
# 远程连接
gs_guc reload -N all -I all -Z coordinator -c "listen_addresses = '*'"gs_guc reload -N all -I all -Z coordinator -c "password_encryption_type=1"gs_guc reload -N all -I all -Z coordinator -h "host all all 0.0.0.0/0 md5"gha_ctl stop all -l http://10.168.10.70:2379gha_ctl start all -l http://10.168.10.70:2379
远程连接测试gsql -d postgres -p 5432 -r -Utest -W'test@1234' -h 10.168.10.70
-
创建库示例
库级常用字符集:GBK/UTF8/Latin1/SQL_ASCII
库级兼容性: oracle = A
MySQL = B
PostgreSQL
=
PG
CREATE DATABASE mysql_test WITH ENCODING = 'Latin1' DBCOMPATIBILITY = 'B' OWNER test;CREATE DATABASE pg_test WITH ENCODING = 'UTF8' DBCOMPATIBILITY = 'PG' OWNER test;CREATE DATABASE oracle_test WITH ENCODING = 'GBK' DBCOMPATIBILITY = 'A' OWNER test;
-
表级别示例
SET search_path = public;CREATE TABLE reason_t2 (r_reason_sk integer,r_reason_id character(16),r_reason_desc character(100))WITH (orientation=row, compression=no)DISTRIBUTE BY HASH(r_reason_sk)TO GROUP default_nodegroup;--向表中插入一条记录。INSERT INTO reason_t2(r_reason_sk, r_reason_id, r_reason_desc) VALUES (1, 'AAAAAAAABAAAAAAA', 'reason1');--向表中插入一条记录,和上一条语法等效。INSERT INTO reason_t2 VALUES (2, 'AAAAAAAABAAAAAAA', 'reason2');--向表中插入多条记录。INSERT INTO reason_t2 VALUES (3, 'AAAAAAAACAAAAAAA','reason3'),(4, 'AAAAAAAADAAAAAAA', 'reason4'),(5, 'AAAAAAAAEAAAAAAA','reason5');--对表创建唯一索引CREATE UNIQUE INDEX reason_t2_u_index ON reason_t2(r_reason_sk);--向表中插入多条记录,如果冲突则更新冲突数据行中r_reason_id字段为'BBBBBBBBCAAAAAAA'。INSERT INTO reason_t2 VALUES (5, 'BBBBBBBBCAAAAAAA','reason5'),(6, 'AAAAAAAADAAAAAAA', 'reason6') ON DUPLICATE KEY UPDATE r_reason_id = 'BBBBBBBBCAAAAAAA';--创建 reason_v1视图create view reason_v1 as select r_reason_sk,r_reason_id from reason_t2;--查询视图select * from reason_v1;r_reason_sk | r_reason_id-------------+------------------3 | AAAAAAAACAAAAAAA4 | AAAAAAAADAAAAAAA1 | AAAAAAAABAAAAAAA2 | AAAAAAAABAAAAAAA5 | BBBBBBBBCAAAAAAA6 | AAAAAAAADAAAAAAA--删除表reason_t2。DROP TABLE reason_t2;
原创文章,作者:kirin,如若转载,请注明出处:https://blog.ytso.com/tech/bigdata/318117.html